Ottimizzare le Prestazioni
These docs are old and won’t be updated. Go to react.dev for the new React docs.
These new documentation pages teach modern React:
Internally, React uses several clever techniques to minimize the number of costly DOM operations required to update the UI. For many applications, using React will lead to a fast user interface without doing much work to specifically optimize for performance. Nevertheless, there are several ways you can speed up your React application.
Use the Production Build
If you’re benchmarking or experiencing performance problems in your React apps, make sure you’re testing with the minified production build.
By default, React includes many helpful warnings. These warnings are very useful in development. However, they make React larger and slower so you should make sure to use the production version when you deploy the app.
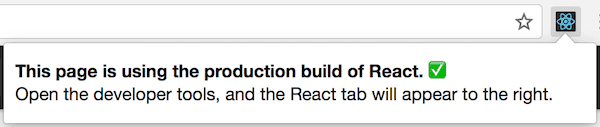
If you aren’t sure whether your build process is set up correctly, you can check it by installing React Developer Tools for Chrome. If you visit a site with React in production mode, the icon will have a dark background:
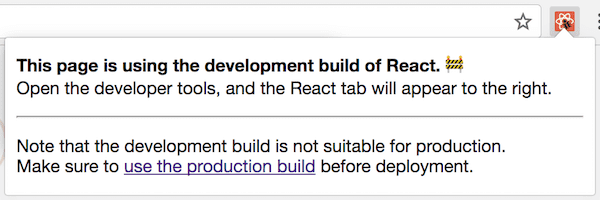
If you visit a site with React in development mode, the icon will have a red background:
It is expected that you use the development mode when working on your app, and the production mode when deploying your app to the users.
You can find instructions for building your app for production below.
Create React App
If your project is built with Create React App, run:
npm run buildThis will create a production build of your app in the build/ folder of your project.
Remember that this is only necessary before deploying to production. For normal development, use npm start.
Single-File Builds
We offer production-ready versions of React and React DOM as single files:
<script src="https://unpkg.com/react@18/umd/react.production.min.js"></script>
<script src="https://unpkg.com/react-dom@18/umd/react-dom.production.min.js"></script>
Remember that only React files ending with .production.min.js are suitable for production.
Brunch
For the most efficient Brunch production build, install the terser-brunch plugin:
# If you use npm
npm install --save-dev terser-brunch

# If you use Yarn
yarn add --dev terser-brunch
Then, to create a production build, add the -p flag to the build command:
brunch build -pRemember that you only need to do this for production builds. You shouldn’t pass the -p flag or apply this plugin in development, because it will hide useful React warnings and make the builds much slower.
Browserify
For the most efficient Browserify production build, install a few plugins:
# If you use npm
npm install --save-dev envify terser uglifyify

# If you use Yarn
yarn add --dev envify terser uglifyify
To create a production build, make sure that you add these transforms (the order matters):
- The
envifytransform ensures the right build environment is set. Make it global (-g). - The
uglifyifytransform removes development imports. Make it global too (-g). - Finally, the resulting bundle is piped to
terserfor mangling (read why).
For example:
browserify ./index.js \
  -g [ envify --NODE_ENV production ] \
  -g uglifyify \
  | terser --compress --mangle > ./bundle.js
Remember that you only need to do this for production builds. You shouldn’t apply these plugins in development because they will hide useful React warnings, and make the builds much slower.
Rollup
For the most efficient Rollup production build, install a few plugins:
# If you use npm
npm install --save-dev rollup-plugin-commonjs rollup-plugin-replace rollup-plugin-terser

# If you use Yarn
yarn add --dev rollup-plugin-commonjs rollup-plugin-replace rollup-plugin-terser
To create a production build, make sure that you add these plugins (the order matters):
- The
replaceplugin ensures the right build environment is set. - The
commonjsplugin provides support for CommonJS in Rollup. - The
terserplugin compresses and mangles the final bundle.
plugins: [
  // ...
  require('rollup-plugin-replace')({
    'process.env.NODE_ENV': JSON.stringify('production')
  }),
  require('rollup-plugin-commonjs')(),
  require('rollup-plugin-terser')(),
  // ...
]
For a complete setup example see this gist.
Remember that you only need to do this for production builds. You shouldn’t apply the terser plugin or the replace plugin with 'production' value in development because they will hide useful React warnings, and make the builds much slower.
webpack
Note:
If you’re using Create React App, please follow the instructions above.
This section is only relevant if you configure webpack directly.
Webpack v4+ will minify your code by default in production mode.
const TerserPlugin = require('terser-webpack-plugin');

module.exports = {
  mode: 'production',
  optimization: {
    minimizer: [new TerserPlugin({ /* additional options here */ })],
  },
};
You can learn more about this in webpack documentation.
Remember that you only need to do this for production builds. You shouldn’t apply TerserPlugin in development because it will hide useful React warnings, and make the builds much slower.
Profiling Components with the DevTools Profiler
react-dom 16.5+ and react-native 0.57+ provide enhanced profiling capabilities in DEV mode with the React DevTools Profiler.
An overview of the Profiler can be found in the blog post “Introducing the React Profiler”.
A video walkthrough of the profiler is also available on YouTube.
If you haven’t yet installed the React DevTools, you can find them here:
Note
A production profiling bundle of
react-domis also available asreact-dom/profiling. Read more about how to use this bundle at fb.me/react-profiling
Note
Before React 17, we use the standard User Timing API to profile components with the chrome performance tab. For a more detailed walkthrough, check out this article by Ben Schwarz.
Virtualize Long Lists
If your application renders long lists of data (hundreds or thousands of rows), we recommend using a technique known as “windowing”. This technique only renders a small subset of your rows at any given time, and can dramatically reduce the time it takes to re-render the components as well as the number of DOM nodes created.
react-window and react-virtualized are popular windowing libraries. They provide several reusable components for displaying lists, grids, and tabular data. You can also create your own windowing component, like Twitter did, if you want something more tailored to your application’s specific use case.
Avoid Reconciliation
React builds and maintains an internal representation of the rendered UI. It includes the React elements you return from your components. This representation lets React avoid creating DOM nodes and accessing existing ones beyond necessity, as that can be slower than operations on JavaScript objects. Sometimes it is referred to as a “virtual DOM”, but it works the same way on React Native.
When a component’s props or state change, React decides whether an actual DOM update is necessary by comparing the newly returned element with the previously rendered one. When they are not equal, React will update the DOM.
Even though React only updates the changed DOM nodes, re-rendering still takes some time. In many cases it’s not a problem, but if the slowdown is noticeable, you can speed all of this up by overriding the lifecycle function shouldComponentUpdate, which is triggered before the re-rendering process starts. The default implementation of this function returns true, leaving React to perform the update:
shouldComponentUpdate(nextProps, nextState) {
  return true;
}
If you know that in some situations your component doesn’t need to update, you can return false from shouldComponentUpdate instead, to skip the whole rendering process, including calling render() on this component and below.
In most cases, instead of writing shouldComponentUpdate() by hand, you can inherit from React.PureComponent. It is equivalent to implementing shouldComponentUpdate() with a shallow comparison of current and previous props and state.
shouldComponentUpdate In Action
Here’s a subtree of components. For each one, SCU indicates what shouldComponentUpdate returned, and vDOMEq indicates whether the rendered React elements were equivalent. Finally, the circle’s color indicates whether the component had to be reconciled or not.
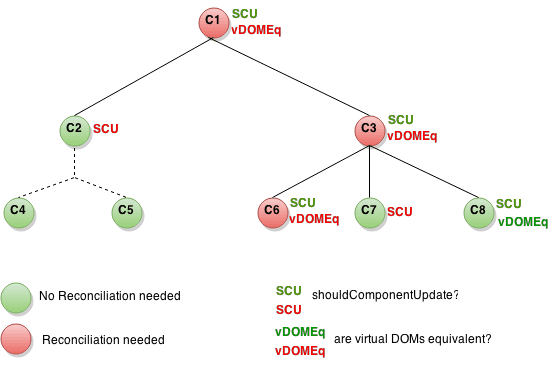
Since shouldComponentUpdate returned false for the subtree rooted at C2, React did not attempt to render C2, and thus didn’t even have to invoke shouldComponentUpdate on C4 and C5.
For C1 and C3, shouldComponentUpdate returned true, so React had to go down to the leaves and check them. For C6 shouldComponentUpdate returned true, and since the rendered elements weren’t equivalent React had to update the DOM.
The last interesting case is C8. React had to render this component, but since the React elements it returned were equal to the previously rendered ones, it didn’t have to update the DOM.
Note that React only had to do DOM mutations for C6, which was inevitable. For C8, it bailed out by comparing the rendered React elements, and for C2’s subtree and C7, it didn’t even have to compare the elements as we bailed out on shouldComponentUpdate, and render was not called.
Examples
If the only way your component ever changes is when the props.color or the state.count variable changes, you could have shouldComponentUpdate check that:
class CounterButton extends React.Component {
  constructor(props) {
    super(props);
    this.state = {count: 1};
  }

  shouldComponentUpdate(nextProps, nextState) {
    if (this.props.color !== nextProps.color) {
      return true;
    }
    if (this.state.count !== nextState.count) {
      return true;
    }
    return false;
  }

  render() {
    return (
      <button
        color={this.props.color}
        onClick={() => this.setState(state => ({count: state.count + 1}))}>
        Count: {this.state.count}
      </button>
    );
  }
}
In this code, shouldComponentUpdate is just checking if there is any change in props.color or state.count. If those values don’t change, the component doesn’t update. If your component got more complex, you could use a similar pattern of doing a “shallow comparison” between all the fields of props and state to determine if the component should update. This pattern is common enough that React provides a helper to use this logic - just inherit from React.PureComponent. So this code is a simpler way to achieve the same thing:
class CounterButton extends React.PureComponent {
  constructor(props) {
    super(props);
    this.state = {count: 1};
  }

  render() {
    return (
      <button
        color={this.props.color}
        onClick={() => this.setState(state => ({count: state.count + 1}))}>
        Count: {this.state.count}
      </button>
    );
  }
}
Most of the time, you can use React.PureComponent instead of writing your own shouldComponentUpdate. It only does a shallow comparison, so you can’t use it if the props or state may have been mutated in a way that a shallow comparison would miss.
This can be a problem with more complex data structures. For example, let’s say you want a ListOfWords component to render a comma-separated list of words, with a parent WordAdder component that lets you click a button to add a word to the list. This code does not work correctly:
class ListOfWords extends React.PureComponent {
  render() {
    return <div>{this.props.words.join(',')}</div>;
  }
}

class WordAdder extends React.Component {
  constructor(props) {
    super(props);
    this.state = {
      words: ['marklar']
    };
    this.handleClick = this.handleClick.bind(this);
  }

  handleClick() {
    // This section is bad style and causes a bug
    const words = this.state.words;
    words.push('marklar');
    this.setState({words: words});
  }

  render() {
    return (
      <div>
        <button onClick={this.handleClick} />
        <ListOfWords words={this.state.words} />
      </div>
    );
  }
}
The problem is that PureComponent will do a simple comparison between the old and new values of this.props.words. Since this code mutates the words array in the handleClick method of WordAdder, the old and new values of this.props.words will compare as equal, even though the actual words in the array have changed. The ListOfWords will thus not update even though it has new words that should be rendered.
The Power Of Not Mutating Data
The simplest way to avoid this problem is to avoid mutating values that you are using as props or state. For example, the handleClick method above could be rewritten using concat as:
handleClick() {
  this.setState(state => ({
    words: state.words.concat(['marklar'])
  }));
}
ES6 supports a spread syntax for arrays which can make this easier. If you’re using Create React App, this syntax is available by default.
handleClick() {
  this.setState(state => ({
    words: [...state.words, 'marklar'],
  }));
};
You can also rewrite code that mutates objects to avoid mutation, in a similar way. For example, let’s say we have an object named colormap and we want to write a function that changes colormap.right to be 'blue'. We could write:
function updateColorMap(colormap) {
  colormap.right = 'blue';
}
To write this without mutating the original object, we can use Object.assign method:
function updateColorMap(colormap) {
  return Object.assign({}, colormap, {right: 'blue'});
}
updateColorMap now returns a new object, rather than mutating the old one. Object.assign is in ES6 and requires a polyfill.
Object spread syntax makes it easier to update objects without mutation as well:
function updateColorMap(colormap) {
  return {...colormap, right: 'blue'};
}
This feature was added to JavaScript in ES2018.
If you’re using Create React App, both Object.assign and the object spread syntax are available by default.
When you deal with deeply nested objects, updating them in an immutable way can feel convoluted. If you run into this problem, check out Immer or immutability-helper. These libraries let you write highly readable code without losing the benefits of immutability.